
承接上一篇的文章,我们学习了angr应用的大概基础框架和符号化寄存器,现在我们来继续学习angr的更多神奇用法
04_angr_symbolic_stack
上一题我们学习了符号化寄存器,这题主要是学习如何符号化栈上的值
首先检查一下文件:
syc@ubuntu:~/Desktop/TEMP$ checksec '/home/syc/Desktop/TEMP/04_angr_symbolic_stack'
[*] '/home/syc/Desktop/TEMP/04_angr_symbolic_stack'
    Arch:     i386-32-little
    RELRO:    Partial RELRO
    Stack:    No canary found
    NX:       NX enabled
    PIE:      No PIE (0x8048000)
然后拖进IDA查看一下程序
int __cdecl main(int argc, const char **argv, const char **envp)
{
  printf("Enter the password: ");
  handle_user();
  return 0;
}
int handle_user()
{
  int result; // eax
  int v1; // [esp+8h] [ebp-10h]
  int v2; // [esp+Ch] [ebp-Ch]

  __isoc99_scanf("%u %u", &v2, &v1);
  v2 = complex_function0(v2);
  v1 = complex_function1(v1);
  if ( v2 == 1999643857 && v1 == -1136455217 )
    result = puts("Good Job.");
  else
    result = puts("Try again.");
  return result;
}
int __cdecl complex_function0(int a1)
{
  return a1 ^ 0x12A567E5;
}
int __cdecl complex_function1(int a1)
{
  return a1 ^ 0x31BCB5D0;
}
这里我们具体看一下是如何传送参数的
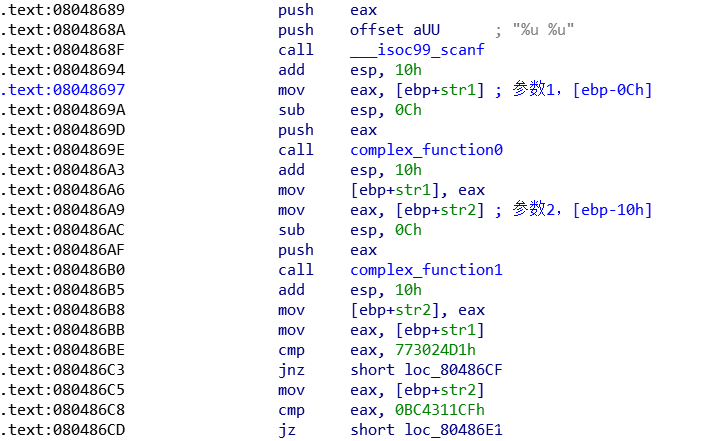
不难发现从之前的寄存器传参变成了利用栈空间传参,这时我们就需要学会对栈上的值进行符号化处理
先提供一下angr的EXP
import angr
import sys
import claripy
def Go():
    path_to_binary = "./04_angr_symbolic_stack"
    project = angr.Project(path_to_binary, auto_load_libs=False)
    start_address = 0x8048697
    initial_state = project.factory.blank_state(addr=start_address)

    initial_state.regs.ebp = initial_state.regs.esp

    passwd_size_in_bits = 32
    passwd0 = claripy.BVS('passwd0', passwd_size_in_bits)
    passwd1 = claripy.BVS('passwd1', passwd_size_in_bits)

    padding_length_in_bytes = 0x8
    initial_state.regs.esp -= padding_length_in_bytes

    initial_state.stack_push(passwd0)
    initial_state.stack_push(passwd1)

    simulation = project.factory.simgr(initial_state)

    def is_successful(state):
        stdout_output = state.posix.dumps(1)
        if b'Good Job.\n' in stdout_output:
            return True
        else:
            return False

    def should_abort(state):
        stdout_output = state.posix.dumps(1)
        if b'Try again.\n' in  stdout_output:
            return True
        else:
            return False

    simulation.explore(find=is_successful, avoid=should_abort)

    if simulation.found:
        for i in simulation.found:
            solution_state = i
            solution0 = (solution_state.solver.eval(passwd0))
            solution1 = (solution_state.solver.eval(passwd1))
            print("[+] Success! Solution is: {0} {1}".format(solution0, solution1))
            #print(solution0, solution1)
    else:
        raise Exception('Could not find the solution')

if __name__ == "__main__":
    Go()
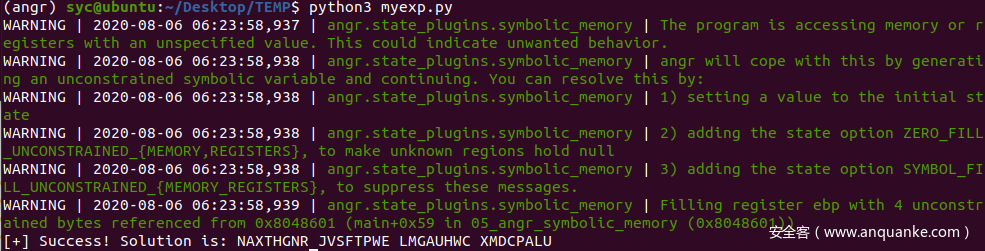
运行一下查看结果:
![]()
现在我们来逐步解析,我们需要确定angr应该从哪里开始,我们跳过scanf()了将从0x8048697处的指令开始
start_address = 0x8048697
initial_state = project.factory.blank_state(addr=start_address)
我们从之前知道要注入的两个值位于@ [EBP - 0x10],[EBP - 0xC]因此我们需要在压入堆栈之前布置好堆栈指针,这里就需要学习一下Linux的栈,我们先将ESP指针恢复到和EBP指针一致,恢复栈帧初始状态,方便我们计算:
initial_state.regs.ebp = initial_state.regs.esp #EBP=ESP
这里我们先整理一下我们所需要的参数在栈上的分布情况
| Low Address | |
|---|---|
| [ EBP – 0x10H ] | S1 |
| [ EBP – 0x0FH ] | S1 |
| [ EBP – 0x0EH ] | S1 |
| [ EBP – 0x0DH ] | S1 |
| [ EBP – 0x0CH ] | S2 |
| [ EBP – 0x0BH ] | S2 |
| [ EBP – 0x0AH ] | S2 |
| [ EBP – 0x09H ] | S2 |
| High Address |
因为是32位下的程序,s1和s2都是32bit大小,也就是4字节,故:
- S1需要占用以下地址:
| 0x10 | 0x0F | 0x0E | 0x0D | - S2需要占用以下地址:
| 0x0C | 0x0B | 0x0A | 0x09 |
故我们需要先抬高栈,以便在将符号值压入堆栈之前提供填充,但是栈是从高地址到低地址增长的,所以我们真正需要的是ESP – 0x8
padding_length_in_bytes = 0x08
initial_state.regs.esp -= padding_length_in_bytes
现在是时候创建我们的符号位向量并将其压入堆栈了。请记住,程序需要两个无符号的整数值(%u %u格式字符串可以理解),因此符号位向量的大小将为32位,因为这是x86架构上无符号整数
passwd0 = claripy.BVS('passwd0', 32) #s1
passwd1 = claripy.BVS('passwd1', 32) #s2

initial_state.stack_push(passwd0)
initial_state.stack_push(passwd1)
之后,其余部分基本上与以前的脚本相同,我们只需要求解符号位向量并打印即可:
if simulation.found:
        for i in simulation.found:
            solution_state = i
            solution0 = (solution_state.solver.eval(passwd0))
            solution1 = (solution_state.solver.eval(passwd1))
            print("[+] Success! Solution is: {0} {1}".format(solution0, solution1))
            #print(solution0, solution1)
    else:
        raise Exception('Could not find the solution')
eval
-
solver.eval(expression)将会解出一个可行解 -
solver.eval_one(expression)将会给出一个表达式的可行解,若有多个可行解,则抛出异常。 -
solver.eval_upto(expression, n)将会给出最多n个可行解,如果不足n个就给出所有的可行解。 -
solver.eval_exact(expression, n)将会给出n个可行解,如果解的个数不等于n个,将会抛出异常。 -
solver.min(expression)将会给出最小可行解 -
solver.max(expression)将会给出最大可行解
另外还有还有cast_to可以接收一个参数来指定把结果映射到哪种数据类型。目前这个参数只能是str,它将会以字符串形式展示返回的结果
05_angr_symbolic_memory
如题目所言这题主要学会符号化内存
我们先检查一下文件:
syc@ubuntu:~/Desktop/TEMP$ checksec 05_angr_symbolic_memory
[*] '/home/syc/Desktop/TEMP/05_angr_symbolic_memory'
    Arch:     i386-32-little
    RELRO:    Partial RELRO
    Stack:    No canary found
    NX:       NX enabled
    PIE:      No PIE (0x8048000)
然后拖进IDA查看一下程序
int __cdecl main(int argc, const char **argv, const char **envp)
{
  int i; // [esp+Ch] [ebp-Ch]

  memset(user_input, 0, 0x21u);
  printf("Enter the password: ");
  __isoc99_scanf("%8s %8s %8s %8s", user_input, &unk_A1BA1C8, &unk_A1BA1D0, &unk_A1BA1D8);
  for ( i = 0; i <= 31; ++i )
    *(_BYTE *)(i + 0xA1BA1C0) = complex_function(*(char *)(i + 0xA1BA1C0), i);// user_input = 0xA1BA1C0
  if ( !strncmp(user_input, "NJPURZPCDYEAXCSJZJMPSOMBFDDLHBVN", 0x20u) )// 用来比较s1和s2字符串的前n个字符
    puts("Good Job.");
  else
    puts("Try again.");
  return 0;
}
int __cdecl complex_function(signed int a1, int a2)
{
  if ( a1 <= 64 || a1 > 90 )
  {
    puts("Try again.");
    exit(1);
  }
  return (9 * a2 + a1 - 65) % 26 + 65;
}
我们查看一下user_input的所处于的地址

不难发现程序的逻辑结构就是:
- 程序将四个8字节长的字符串作为输入
- 字符串分别位于以下地址[0xA1BA1C0, 0xA1BA1C8, 0xA1BA1D0, 0xA1BA1D8]
- 输入的字符串循环输入
complex_function()函数进行变换 - 循环变换后的字符串与
"NJPURZPCDYEAXCSJZJMPSOMBFDDLHBVN"比较前0x20个字符
好了,我们现在有足够的信息来开始编写EXP的工作,先放一下EXP:
import angr
import sys
import claripy
def Go():
    path_to_binary = "./05_angr_symbolic_memory"
    project = angr.Project(path_to_binary, auto_load_libs=False)
    start_address = 0x8048601
    initial_state = project.factory.blank_state(addr=start_address)

    passwd_size_in_bits = 64
    passwd0 = claripy.BVS('passwd0', passwd_size_in_bits)
    passwd1 = claripy.BVS('passwd1', passwd_size_in_bits)
    passwd2 = claripy.BVS('passwd2', passwd_size_in_bits)
    passwd3 = claripy.BVS('passwd3', passwd_size_in_bits)

    passwd0_address = 0xA1BA1C0
    #passwd1_address = 0xA1BA1C8
    #passwd2_address = 0xA1BA1D0
    #passwd3_address = 0xA1BA1D8
    initial_state.memory.store(passwd0_address, passwd0)
    initial_state.memory.store(passwd0_address + 0x8,  passwd1)
    initial_state.memory.store(passwd0_address + 0x10, passwd2)
    initial_state.memory.store(passwd0_address + 0x18, passwd3)

    simulation = project.factory.simgr(initial_state)

    def is_successful(state):
        stdout_output = state.posix.dumps(1)
        if b'Good Job.\n' in stdout_output:
            return True
        else:
            return False

    def should_abort(state):
        stdout_output = state.posix.dumps(1)
        if b'Try again.\n' in  stdout_output:
            return True
        else:
            return False

    simulation.explore(find=is_successful, avoid=should_abort)

    if simulation.found:
        for i in simulation.found:
            solution_state = i
            solution0 = solution_state.solver.eval(passwd0,cast_to=bytes)
            solution1 = solution_state.solver.eval(passwd1,cast_to=bytes)
            solution2 = solution_state.solver.eval(passwd2,cast_to=bytes)
            solution3 = solution_state.solver.eval(passwd3,cast_to=bytes)
            solution = solution0 + b" " + solution1 + b" " + solution2 + b" " + solution3
            print("[+] Success! Solution is: {}".format(solution.decode("utf-8")))
            #print(solution0, solution1, solution2, solution3)
    else:
        raise Exception('Could not find the solution')

if __name__ == "__main__":
    Go()
运行一下查看一下结果:
这次start_addr从0x08048601也就是跳过scanf
path_to_binary = "./05_angr_symbolic_memory"
project = angr.Project(path_to_binary, auto_load_libs=False)
start_address = 0x8048601
initial_state = project.factory.blank_state(addr=start_address)
因为这次输入的是四个8字节64比特大小的字符串,所以我们需要创建四个相同大小的符号位向量
passwd_size_in_bits = 64
passwd0 = claripy.BVS('passwd0', passwd_size_in_bits)
passwd1 = claripy.BVS('passwd1', passwd_size_in_bits)
passwd2 = claripy.BVS('passwd2', passwd_size_in_bits)
passwd3 = claripy.BVS('passwd3', passwd_size_in_bits)
state.memory
前面提到可以通过 state.mem[index] 访问内存,但对于一段连续内存的操作十分不方便。因此我们也可以使用 state.memory 的 .load(addr, size) / .store(addr, val) 接口读写内存, size 以 bytes 为单位
这些函数的原型:
def load(self, addr, size=None, condition=None, fallback=None, add_constraints=None, action=None, endness=None,
             inspect=True, disable_actions=False, ret_on_segv=False):
        """
        Loads size bytes from dst.
        :param addr:             The address to load from. #读取的地址
        :param size:            The size (in bytes) of the load. #大小
        :param condition:       A claripy expression representing a condition for a conditional load.
        :param fallback:        A fallback value if the condition ends up being False.
        :param add_constraints: Add constraints resulting from the merge (default: True).
        :param action:          A SimActionData to fill out with the constraints.
        :param endness:         The endness to load with. #端序
def store(self, addr, data, size=None, condition=None, add_constraints=None, endness=None, action=None,
              inspect=True, priv=None, disable_actions=False):
        """
        Stores content into memory.
        :param addr:        A claripy expression representing the address to store at. #内存地址
        :param data:        The data to store (claripy expression or something convertable to a claripy expression).#写入的数据
        :param size:        A claripy expression representing the size of the data to store. #大小
        ...
然后就可以开始符号化内存,因为这四个地址均是连续的地址,我们只需要连续加上0x8即可
passwd0_address = 0xA1BA1C0
#passwd1_address = 0xA1BA1C8
#passwd2_address = 0xA1BA1D0
#passwd3_address = 0xA1BA1D8
initial_state.memory.store(passwd0_address, passwd0)
initial_state.memory.store(passwd0_address + 0x8,  passwd1)
initial_state.memory.store(passwd0_address + 0x10, passwd2)
initial_state.memory.store(passwd0_address + 0x18, passwd3)
然后我们将模拟管理器重置为我们之前设置好的状态
simulation = project.factory.simgr(initial_state)
接下来就和之前一直做的一样,设定好模拟器的路径选择,执行并提取查看结果即可
06_angr_symbolic_dynamic_memory
这题主要是学会符号化动态内存,这个题与上题没有太大区别,除了字符串的内存是通过堆malloc()而不是堆栈分配的
我们先检查一下文件:
Arch:     i386-32-little
RELRO:    Partial RELRO
Stack:    No canary found
NX:       NX enabled
PIE:      No PIE (0x8048000)
然后拖进IDA查看一下程序
int __cdecl main(int argc, const char **argv, const char **envp)
{
  char *v3; // ebx
  char *v4; // ebx
  int v6; // [esp-10h] [ebp-1Ch]
  signed int i; // [esp+0h] [ebp-Ch]

  buffer0 = (char *)malloc(9u);
  buffer1 = (char *)malloc(9u);
  memset(buffer0, 0, 9u);
  memset(buffer1, 0, 9u);
  printf("Enter the password: ");
  __isoc99_scanf("%8s %8s", buffer0, buffer1, v6);
  for ( i = 0; i <= 7; ++i )
  {
    v3 = &buffer0[i];
    *v3 = complex_function(buffer0[i], i);
    v4 = &buffer1[i];
    *v4 = complex_function(buffer1[i], i + 32);
  }
  if ( !strncmp(buffer0, "UODXLZBI", 8u) && !strncmp(buffer1, "UAORRAYF", 8u) )
    puts("Good Job.");
  else
    puts("Try again.");
  free(buffer0);
  free(buffer1);
  return 0;
}
int __cdecl complex_function(signed int a1, int a2)
{
  if ( a1 <= 64 || a1 > 90 )
  {
    puts("Try again.");
    exit(1);
  }
  return (13 * a2 + a1 - 65) % 26 + 65;
}
我们可以总结出这个程序的逻辑:
- 程序使用
malloc()函数分配出了两个大小为9字节的缓冲区,并将其初始化为0 - 然后将两个字符串以
scanf("%8s %8s")作为格式化字符串分别输入进缓冲区内 - 然后利用
complex_function()函数分别对两个字符串进行变换 - 然后将变换后的字符串分别与“UODXLZBI”和“UAORRAYF”进行比较
先放一下EXP:
import angr
import sys
import claripy
def Go():
    path_to_binary = "./06_angr_symbolic_dynamic_memory"
    project = angr.Project(path_to_binary, auto_load_libs=False)
    start_address = 0x8048699
    initial_state = project.factory.blank_state(addr=start_address)

    passwd_size_in_bits = 64
    passwd0 = claripy.BVS('passwd0', passwd_size_in_bits)
    passwd1 = claripy.BVS('passwd1', passwd_size_in_bits)

    fake_heap_address0 = 0xffffc93c
    pointer_to_malloc_memory_address0 = 0xabcc8a4
    fake_heap_address1 = 0xffffc94c
    pointer_to_malloc_memory_address1 = 0xabcc8ac
    initial_state.memory.store(pointer_to_malloc_memory_address0, fake_heap_address0, endness=project.arch.memory_endness)
    initial_state.memory.store(pointer_to_malloc_memory_address1, fake_heap_address1, endness=project.arch.memory_endness)

    initial_state.memory.store(fake_heap_address0, passwd0)
    initial_state.memory.store(fake_heap_address1, passwd1)

    simulation = project.factory.simgr(initial_state)

    def is_successful(state):
        stdout_output = state.posix.dumps(1)
        if b'Good Job.\n' in stdout_output:
            return True
        else:
            return False

    def should_abort(state):
        stdout_output = state.posix.dumps(1)
        if b'Try again.\n' in  stdout_output:
            return True
        else:
            return False

    simulation.explore(find=is_successful, avoid=should_abort)

    if simulation.found:
        for i in simulation.found:
            solution_state = i
            solution0 = solution_state.solver.eval(passwd0, cast_to=bytes)
            solution1 = solution_state.solver.eval(passwd1, cast_to=bytes)
            print("[+] Success! Solution is: {0} {1}".format(solution0.decode('utf-8'), solution1.decode('utf-8')))
            #print(solution0, solution1)
    else:
        raise Exception('Could not find the solution')

if __name__ == "__main__":
    Go()
运行一下:

我们从0x8048699指向的地址开始,该地址指向MOV DWORD [EBP - 0xC], 0x0调用之后的指令scanf()。我们基本上会跳过所有malloc(),因为我们稍后将在脚本中处理它们
path_to_binary = "./06_angr_symbolic_dynamic_memory"
project = angr.Project(path_to_binary, auto_load_libs=False)
start_address = 0x8048699
initial_state = project.factory.blank_state(addr=start_address)
然后因为缓冲区的大小是8字节,故换算成比特即为64比特的大小,最后我们初始化两个大小为64位的符号位向量
passwd_size_in_bits = 64
passwd0 = claripy.BVS('passwd0', passwd_size_in_bits)
passwd1 = claripy.BVS('passwd1', passwd_size_in_bits)
我们注意到这次scanf函数的输入使用的是两个存储区

我们可以看到malloc()分配了两个缓冲区,因为maclloc()函数只有一个参数,通过push 9不难推测出两个缓冲区大小为9字节(IDA也能直接看到的说),并返回缓冲区地址到EAX寄存器中
实际上,可以看到在两次调用之后,根据mov ds:buffer0, eax和mov ds:buffer1, eax得知开辟后的缓冲区被复制到标识为buffer0和buffer1的两个存储区中
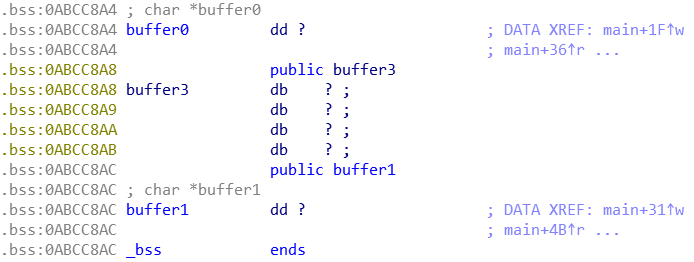
且根据IDA可以得知buffer0的地址为0xABCC8A4,buffer1的地址为0xABCC8AC
回到我们最开始认识angr的时候,我们知道angr并没有真正“运行”二进制文件(至少到目前为止),它只是在模拟运行状态,因此它实际上不需要将内存分配到堆中,实际上可以伪造任何地址。我们所做的是我们在堆栈选择两个地址存放我们的缓冲区地址。之后我们告诉angr,将两个fake address分别保存到 buffer0,buffer1 ,因为程序实际执行的时候就会把 malloc返回的地址保存到这里。最后我们把符号位向量保存到 伪造的地址里。
这里我们选择0xffffc93c和0xffffc94c即可,然后将我们分别的缓冲区地址放入这两个地址中,参数 endness 用于设置端序,angr默认为大端序,总共可选的值如下:
LE – 小端序(little endian, least significant byte is stored at lowest address)
BE – 大端序(big endian, most significant byte is stored at lowest address)
ME – 中间序(Middle-endian. Yep.)
这里我们直接设置为与项目的程序相同即可
fake_heap_address0 = 0xffffc93c
pointer_to_malloc_memory_address0 = 0xabcc8a4
fake_heap_address1 = 0xffffc94c
pointer_to_malloc_memory_address1 = 0xabcc8ac
initial_state.memory.store(pointer_to_malloc_memory_address0, fake_heap_address0, endness=project.arch.memory_endness)
initial_state.memory.store(pointer_to_malloc_memory_address1, fake_heap_address1, endness=project.arch.memory_endness)
这里总的逻辑是这样的,之前是buffer指向的是malloc分配好的内存地址,string存在这里。现在是buffer指向的是我们伪造的地址,符号位向量存在这里
BEFORE:
buffer0 -> malloc()ed address 0 -> string 0
buffer1 -> malloc()ed address 1 -> string 1

AFTER:
buffer0 -> fake address 0 -> symbolic bitvector 0
buffer1 -> fake address 1 -> symbolic bitvector 1
其余的部分和之前的情况差不多,不再赘述
07_angr_symbolic_file
这题主要学习如何符号化一个文件里面的内容
先检查一下文件:
syc@ubuntu:~/Desktop/TEMP$ checksec 07_angr_symbolic_file
[*] '/home/syc/Desktop/TEMP/07_angr_symbolic_file'
    Arch:     i386-32-little
    RELRO:    Partial RELRO
    Stack:    Canary found
    NX:       NX enabled
    PIE:      No PIE (0x8048000)
然后拖进IDA查看一下程序
int __cdecl __noreturn main(int argc, const char **argv, const char **envp)
{
  int i; // [esp+Ch] [ebp-Ch]

  memset(buffer, 0, 0x40u);
  printf("Enter the password: ");
  __isoc99_scanf("%64s", buffer);
  ignore_me((int)buffer, 0x40u);
  memset(buffer, 0, 0x40u);
  fp = fopen("OJKSQYDP.txt", "rb");
  fread(buffer, 1u, 0x40u, fp);
  fclose(fp);
  unlink("OJKSQYDP.txt");
  for ( i = 0; i <= 7; ++i )
    *(_BYTE *)(i + 0x804A0A0) = complex_function(*(char *)(i + 0x804A0A0), i);
  if ( strncmp(buffer, "AQWLCTXB", 9u) )
  {
    puts("Try again.");
    exit(1);
  }
  puts("Good Job.");
  exit(0);
}
unsigned int __cdecl ignore_me(int a1, size_t n)
{
  void *v2; // esp
  int v4; // [esp+0h] [ebp-28h]
  void *ptr; // [esp+Ch] [ebp-1Ch]
  size_t v6; // [esp+10h] [ebp-18h]
  void *s; // [esp+14h] [ebp-14h]
  FILE *stream; // [esp+18h] [ebp-10h]
  unsigned int v9; // [esp+1Ch] [ebp-Ch]

  ptr = (void *)a1;
  v9 = __readgsdword(0x14u);
  v6 = n - 1;
  v2 = alloca(16 * ((n + 15) / 0x10));
  s = &v4;
  memset(&v4, 0, n);
  unlink("OJKSQYDP.txt");
  stream = fopen("OJKSQYDP.txt", "a+b");
  fwrite(ptr, 1u, n, stream);
  fseek(stream, 0, 0);
  __isoc99_fscanf(stream, "%64s", s);
  fseek(stream, 0, 0);
  fwrite(s, 1u, n, stream);
  fclose(stream);
  return __readgsdword(0x14u) ^ v9;
}
int __cdecl complex_function(signed int a1, int a2)
{
  if ( a1 <= 64 || a1 > 90 )
  {
    puts("Try again.");
    exit(1);
  }
  return (17 * a2 + a1 - 65) % 26 + 65;
}
我们可以得知程序使用fread函数从文件中加载密码,如果密码正确,则会打印“ Good Job”。ignore_me主要是把第一个读取的内容存入OJKSQYDP.txt, 不用我们自己创建文件 ,然后从文件OJKSQYDP.txt读取数据存入buff
老样子先上EXP在逐一分析:
import angr
import sys
import claripy
def Go():
    path_to_binary = "./07_angr_symbolic_file"
    project = angr.Project(path_to_binary, auto_load_libs=False)
    start_address =  0x80488EA
    initial_state = project.factory.blank_state(addr=start_address)

    filename = 'OJKSQYDP.txt'
    symbolic_file_size_bytes = 64
    passwd0 = claripy.BVS('password', symbolic_file_size_bytes * 8)
    passwd_file = angr.storage.SimFile(filename, content=passwd0, size=symbolic_file_size_bytes)

    initial_state.fs.insert(filename, passwd_file)

    simulation = project.factory.simgr(initial_state)

    def is_successful(state):
        stdout_output = state.posix.dumps(1)
        if b'Good Job.\n' in stdout_output:
            return True
        else:
            return False

    def should_abort(state):
        stdout_output = state.posix.dumps(1)
        if b'Try again.\n' in  stdout_output:
            return True
        else:
            return False

    simulation.explore(find=is_successful, avoid=should_abort)

    if simulation.found:
        for i in simulation.found:
            solution_state = i
            solution0 = solution_state.solver.eval(passwd0, cast_to=bytes)
            print("[+] Success! Solution is: {0}".format(solution0.decode('utf-8')))
            #print(solution0)
    else:
        raise Exception('Could not find the solution')

if __name__ == "__main__":
    Go()
运行一下查看结果:

我们可以知道这个程序:
- 读取一个名叫’OJKSQYDP.txt’的文件作为密码
- 我们需要使用Angr模拟一个文件系统,其中该文件被我们自己的模拟文件所替代
- 然后将该文件进行符号化处理
状态插件(state plugin)
除了刚刚讨论过的选项集,所有存储在SimState中的东西实际上都存储在附加在state上的“插件”中。到目前为止我们讨论的几乎所有state的属性都是一个插件——memory、registers、mem、regs、solver等等。这种设计带来了代码的模块化和能够便捷地为模拟状态的其他方面实现新的数据存储,或者提供插件的替代实现能力。
比如说,通常memory插件模拟一个平坦地址空间,但是在分析中可以选择开启“抽象内存”插件来支持state.memory,“抽象内存”使用新的数据类型表示地址,以模拟浮动的独立内存空间映射。反过来,插件可以减少代码的复杂性:state.memory和state.registers实际上是同一个插件的不同实例,因为寄存器也是用一块地址空间模拟的。
能够控制仿真程序所看到的环境,包括如何从环境中引入符号数据,这一点非常重要!angr具有一系列可靠的抽象概念,可帮助您设置所需的环境。
仿真文件系统-The Emulated Filesystem
这题的关键是利用了angr强大的仿真文件系统。在angr中与文件系统,套接字,管道或终端的任何交互的根源都是SimFile对象。SimFile是一种存储抽象,它定义符号或其他形式的字节序列。您可以从某个位置读取文件,可以在某个位置写入文件,可以询问文件中当前存储了多少字节,还可以具体化文件,并为其生成测试用例。
简单来说利用SimFile形成符号化的文件的格式:
simgr_file = angr.storage.SimFile(filename, content=xxxxxx, size=file_size)
然后需要传给state的初始化过程来影响对文件系统的使用。我们可以利用fs选项以文件名的字典来预配置SimFile对象,也可以fs.insert是将文件插入到文件系统中,需要文件名与符号化的文件
initial_state.fs.insert(filename, simgr_file)
我们从IDA可以知道输入的是格式化字符串%64s也就是64个字符,一个字符是8比特,故最后是512比特
最后的得到这一部分代码:
filename = 'OJKSQYDP.txt'
symbolic_file_size_bytes = 64
passwd0 = claripy.BVS('password', symbolic_file_size_bytes * 8)
passwd_file = angr.storage.SimFile(filename, content=passwd0, size=symbolic_file_size_bytes)

initial_state.fs.insert(filename, passwd_file)

simulation = project.factory.simgr(initial_state)
其它的与之前的题目一致,不再赘述
参考文献
【1】angr官方文档—— https://docs.angr.io/core-concepts
【2】angr 系列教程(一)核心概念及模块解读—— https://xz.aliyun.com/t/7117#toc-14
【3】Introduction to angr Part 2 —— https://blog.notso.pro/2019-03-26-angr-introduction-part2/
【4】Introduction to angr Part 3 —— https://blog.notso.pro/2019-04-10-angr-introduction-part3/
【4】angr文档翻译 —— https://www.jianshu.com/p/3ecafe701578